Appearance
部件使用
lv_lable标签
主要用于文本的显示, 标题提示信息等
- 主体LV_PART_MAIN
- 滚动条LV_PART_SCROLLBAR
- 选中的文本LV_PART_SELECTED
创建以及设置文本
c
lv_obj_t *lable = lv_label_create(lv_scr_act());
lv_label_set_text(lable, "Hello World");- 设置文本有三种方式
- 直接设置
c
void lv_label_set_text(lv_obj_t * obj, const char * text);这一个文本放在文本的动态内存里面
- 文本在指定的缓冲区里面
c
void lv_label_set_text_static(lv_obj_t * obj, const char * text);这一个内存被释放以及被改写的话这一个获取的信息是不可靠的, 这一个文本从代码段过来的话, 是不可以进行修改的
- With lv_label_set_text_fmt(label, "Value: %d", 15) printf formatting can be used to set the text.
c
void lv_label_set_text_fmt(lv_obj_t * obj, const char * fmt, ...)设置长文本模式
当这一个标签没有设置宽度的时候, 会自动扩展, 设置的话需要设置这一个标签的长文本模式
c
void lv_label_set_long_mode(lv_obj_t *obj, lv_label_long_mode_t long_mode)cenum { LV_LABEL_LONG_WRAP, /**< Keep the object width, wrap the too long lines and expand the object height*/ LV_LABEL_LONG_DOT, /**< 在最后加点*/ LV_LABEL_LONG_SCROLL, /**< 查出的时候循环(左右移动)*/ LV_LABEL_LONG_SCROLL_CIRCULAR, /**< 文本超出的时候循环播放(一周)*/ LV_LABEL_LONG_CLIP, /**< Keep the size and clip the text out of it*/ };
设置文本样式
c
void lv_obj_set_style_text_color(struct _lv_obj_t * obj, lv_color_t value, lv_style_selector_t selector);
void lv_obj_set_style_text_color_filtered(struct _lv_obj_t * obj, lv_color_t value, lv_style_selector_t selector);
void lv_obj_set_style_text_opa(struct _lv_obj_t * obj, lv_opa_t value, lv_style_selector_t selector);
void lv_obj_set_style_text_font(struct _lv_obj_t * obj, const lv_font_t * value, lv_style_selector_t selector);
void lv_obj_set_style_text_letter_space(struct _lv_obj_t * obj, lv_coord_t value, lv_style_selector_t selector);
void lv_obj_set_style_text_line_space(struct _lv_obj_t * obj, lv_coord_t value, lv_style_selector_t selector);
void lv_obj_set_style_text_decor(struct _lv_obj_t * obj, lv_text_decor_t value, lv_style_selector_t selector);
void lv_obj_set_style_text_align(struct _lv_obj_t * obj, lv_text_align_t value, lv_style_selector_t selector);
还可以设置背景, 设置背景的时候需要设置透明度, 设置字体的时候需要在lv_conf.h这一个文件里面把这一个字体进行改变
- 设置个别字体的颜色
c
lv_label_set_recolor(label2, true);
lv_label_set_text(label2, "It is a #ff0000 circularly# scrolling text.");
颜色后面需要有一个空格
- 阴影
实际是把这一个文本绘制两遍, 后面的那一个颜色比较浅
c
    /*Create a style for the shadow*/
    static lv_style_t style_shadow;
    lv_style_init(&style_shadow);
    lv_style_set_text_opa(&style_shadow, LV_OPA_30); //设置为透明度为30
    lv_style_set_text_color(&style_shadow, lv_color_black());

    /*Create a label for the shadow first (it's in the background)*/
    lv_obj_t * shadow_label = lv_label_create(lv_scr_act());
    lv_obj_add_style(shadow_label, &style_shadow, 0);

    /*Create the main label*/
    lv_obj_t * main_label = lv_label_create(lv_scr_act());
    lv_label_set_text(main_label, "A simple method to create\n"
                      "shadows on a text.\n"
                      "It even works with\n\n"
                      "newlines     and spaces.");

    /*Set the same text for the shadow label*/
    lv_label_set_text(shadow_label, lv_label_get_text(main_label));

    /*Position the main label*/
    lv_obj_align(main_label, LV_ALIGN_CENTER, 0, 0);

    /*Shift the second label down and to the right by 2 pixel*/
    lv_obj_align_to(shadow_label, main_label, LV_ALIGN_TOP_LEFT, 2, 2);
c
    static lv_style_t style;
    lv_style_init(&style);
    lv_style_set_bg_opa(&style, LV_OPA_40);
    lv_style_set_bg_color( &style, lv_color_hex(0xff0000) ); //设置背景色
    lv_style_set_bg_grad_color( &style, lv_color_hex( 0x0000ff ) ); //设置过度
    lv_style_set_bg_grad_dir(&style, LV_GRAD_DIR_HOR);
    lv_style_set_text_color(&style, lv_color_white());

    lv_obj_t *label = lv_label_create(lv_scr_act());
    lv_label_set_text(label, "Hello World!");
    lv_obj_add_style(label, &style, LV_STATE_DEFAULT);

    // lv_obj_set_style_bg_opa(label, LV_OPA_COVER, LV_PART_MAIN);
    // lv_obj_set_style_bg_color(label, lv_color_hex(0x00ff00), LV_PART_MAIN);

    lv_obj_align(label, LV_ALIGN_CENTER, 0, 0);
设置图标
c
lv_label_set_text(my_label, LV_SYMBOL_OK);
lv_label_set_text(my_label, LV_SYMBOL_OK "Apply");
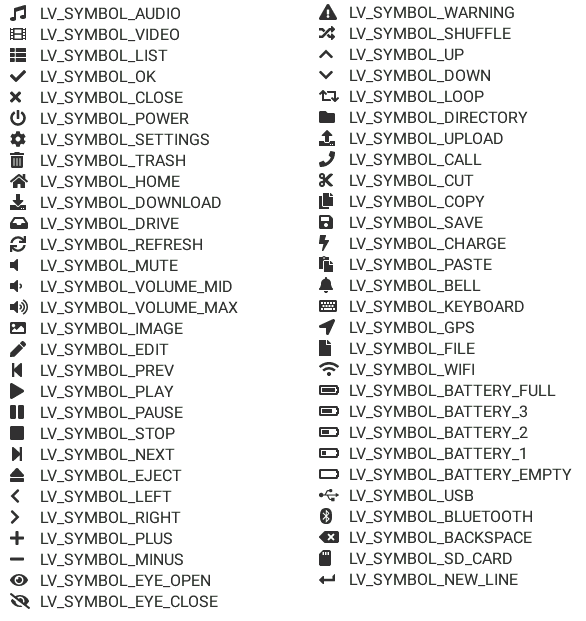
lv_label_set_text(my_label, LV_SYMBOL_OK LV_SYMBOL_WIFI LV_SYMBOL_PLAY);这里的SYMBOL实际是一个字符
按钮lv_button
和基础对象相比没有加入新的东西, 默认的点击效果是放大
c
lv_obj_add_flag(btn, LV_OBJ_FLAG_CLICKABLE);
lv_obj_add_event_cb(btn, btn_event_cb, LV_EVENT_CLICKED, NULL);
有两个可以添加的标志LV_OBJ_FLAG_CLICKABLE, 这时候LV_EVENT_VALUE_CHANGED这一个回调会被触发
需要设置字体的时候, 需要一个lable对象以这一个按钮位父对象
Note that the state of
LV_KEY_ENTERis translated toLV_EVENT_PRESSED/PRESSING/RELEASEDetc.
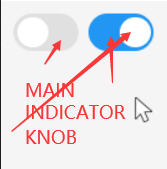
开关lv_switch
开关通常用于某一个功能的开启和关闭, 可以直接显示这一个被控对象的状态
- LV_PART_MAIN 没有被选择的时候的部分
- LV_PART_KNOB 手柄
- LV_PART_INDICATOR 指示器, 选择的时候非手柄的部分
c
lv_obj_set_style_bg_color(switch2, lv_color_make(0x00, 0x00, 0x00), LV_PART_INDICATOR | LV_STATE_CHECKED);设置指示器的时候由于不是默认的状态, 所以需要加上这一个状态
设置状态
c
lv_obj_add_state(switch1, LV_STATE_CHECKED);
lv_obj_clear_state(switch1, LV_STATE_CHECKED | LV_STATE_DISABLED);//设置为不可以修改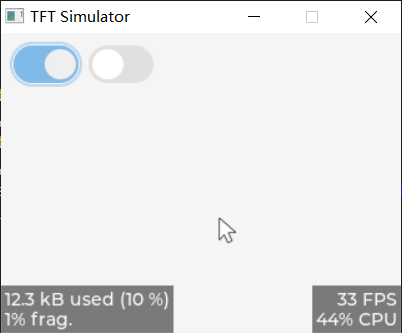
获取状态
To get the current state of the switch (with true being on), use lv_obj_has_state(obj, LV_STATE_CHECKED).
事件
LV_EVENT_VALUE_CHANGEDSent when the switch changes state.
c
lv_obj_add_event_cb(switch2, btn_event_cb, LV_EVENT_VALUE_CHANGED, NULL); //添加回调函数

void btn_event_cb(lv_event_t * e)
{
    lv_event_code_t event = lv_event_get_code(e);
    if (event == LV_EVENT_VALUE_CHANGED)
    {
        lv_obj_t *switch1 = lv_event_get_target(e);
        if (lv_obj_has_state(switch1, LV_STATE_CHECKED))
            printf("ON\n");
        else
            printf("OFF\n");
    }
}
复选框lv_checkbox
选择某一个内容的开启和关闭, 可以理解为一个自带标签的开关
- LV_PART_MAIN 主题部分, 包括标签
- LV_PART_INDICATOR 勾选框
设置文本
The text can be modified with the lv_checkbox_set_text(cb, "New text") function and will be dynamically allocated.
设置状态
c
lv_obj_add_state(cb, LV_STATE_CHECKED);   /*Make the checkbox checked*/
lv_obj_remove_state(cb, LV_STATE_CHECKED); /*Make the checkbox unchecked*/
lv_obj_add_state(cb, LV_STATE_CHECKED | LV_STATE_DISABLED); /*Make the checkbox checked and disabled*/
To get whether the checkbox is checked or not use: lv_obj_has_state(cb, LV_STATE_CHECKED).
设置文本和勾选框间距
c
void lv_obj_set_style_pad_column(struct _lv_obj_t * obj, lv_coord_t value, lv_style_selector_t selector)事件
LV_EVENT_VALUE_CHANGEDSent when the checkbox is toggled.
具体的使用和按钮是一样的
进度条lv_bar
用于显示一个任务的完成进度
- LV_PART_MAIN: The background of the bar and it uses the typical background style properties. Adding padding makes the indicator smaller or larger. The
anim_timestyle property sets the animation time if the values set withLV_ANIM_ON.主体 - LV_PART_INDICATOR: The indicator itself; also uses all the typical background properties.指示器
设置数值
可以设置大小, 当前值, 范围值
c
lv_obj_t *bar = lv_bar_create(lv_scr_act());
lv_obj_set_size(bar, 400, 20); //这一个长和宽的大小会改变这一个进度条是水平的还是垂直的
lv_bar_set_value(bar, 50, LV_ANIM_ON); //设置当前的值,使用动画
lv_bar_set_range(bar, -100, 100);
lv_obj_set_style_anim_time(bar, 1000, LV_STATE_DEFAULT); //设置动画的时间 这一个设置必须在设置当前值之前
这一个动画时间的设置实际是旧值到新值使用的绘图时间
设置起始点
希望加载的时候不是从起始的位置开始的时候可以设置为其他模式
c
lv_bar_set_mode(bar, LV_BAR_MODE_RANGE);
lv_bar_set_start_value(bar, 10, LV_ANIM_OFF);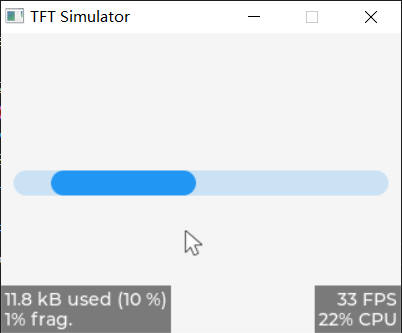
c
enum {
    LV_BAR_MODE_NORMAL, //默认的模式
    LV_BAR_MODE_SYMMETRICAL, //设置为从0开始到当前值(可以为负数)
    LV_BAR_MODE_RANGE //可以设置起始值, 但是这一个值必须小于当前值
};
加载器部件lv_spinner
提示用户正在加载, 一个圆弧形状的加载条
- LV_PART_MAIN 主题
- LV_PART_INDICATOR 指示器
- LV_PART_KNOB 手柄
创建
c
lv_obj_t * lv_spinner_create(lv_obj_t * parent, uint32_t time, uint32_t arc_length);设置圆弧的颜色
c
void lv_obj_set_style_arc_color(struct _lv_obj_t * obj, lv_color_t value, lv_style_selector_t selector)使用这一个设置主体以及指示器的颜色
c
void lv_style_set_arc_width(lv_style_t * style, lv_coord_t value); //圆弧的宽度(主体和指示器)
void lv_style_set_arc_rounded(lv_style_t * style, bool value); //圆弧的头部是不是圆头
void lv_style_set_arc_color(lv_style_t * style, lv_color_t value); //设置颜色
void lv_style_set_arc_color_filtered(lv_style_t * style, lv_color_t value);
void lv_style_set_arc_opa(lv_style_t * style, lv_opa_t value); //透明度
void lv_style_set_arc_img_src(lv_style_t * style, const void * value);
LED lv_led
- LV_PART_MAIN
不同的版本显示的是不同的
颜色
You can set the color of the LED with lv_led_set_color(led, lv_color_hex(0xff0080)). This will be used as background color, border color, and shadow color.
亮度
You can set their brightness with lv_led_set_bright(led, bright). The brightness should be between 0 (darkest) and 255 (lightest).
开启以及关闭
Use lv_led_on(led) and lv_led_off(led) to set the brightness to a predefined ON or OFF value. The lv_led_toggle(led) toggles between the ON and OFF state.
列表部件
用于多选一的时候, 默认会展示多个部件
- LV_PART_MAIN 主题
- LV_PART_SCROLLBAR 滚动条
添加按钮
lv_list_add_button(list, icon, text) adds a full-width button with an icon, 可以使用内置的一部分图标LV_SYMBOL_xxx
添加文本
lv_list_add_text(list, text) adds a text.
获取文本
c
lv_list_get_button_text(list1, obj)添加选中
c
lv_obj_add_state(child, LV_STATE_CHECKED);实际就是按键的选中
下拉列表lv_dropdown
下拉按钮部分
LV_PART_MAINThe background of the button. Uses the typical background properties and text properties for the text on it.LV_PART_INDICATORTypically an arrow symbol that can be an image or a text (LV_SYMBOL).
按键部分
LV_PART_MAINThe list itself. Uses the typical background properties.max_heightcan be used to limit the height of the list.LV_PART_SCROLLBARThe scrollbar background, border, shadow properties and width (for its own width) and right padding for the spacing on the right.LV_PART_SELECTEDRefers to the currently pressed, checked or pressed+checked option. Also uses the typical background properties.
The list is hidden/shown on open/close. To add styles to it use lv_dropdown_get_list(dropdown) to get the list object. For example:
c
lv_obj_t * list = lv_dropdown_get_list(dropdown) /*Get the list*/
lv_obj_add_style(list, &my_style, selector)      /*Add the styles to the list*/
设置内容
Options are passed to the drop-down list as a string with lv_dropdown_set_options(dropdown, options). Options should be separated by \n. For example: "First\nSecond\nThird". This string will be saved in the drop-down list, so it can in a local variable. 使用这一个添加一个文本的按钮
The lv_dropdown_add_option(dropdown, "New option", pos) function inserts a new option to pos index.这一个可以选择索引
获取索引
The get the index of the selected option, use lv_dropdown_get_selected(dropdown).
lv_dropdown_get_selected_str(dropdown, buf, buf_size) copies the name of the selected option to buf.
设置选中
lv_dropdown_set_selected(dropdoen, index)
事件
LV_EVENT_VALUE_CHANGEDSent when the new option is selected or the list is opened/closed.LV_EVENT_CANCELSent when the list is closedLV_EVENT_READYSent when the list is opened
设置方向和图标
c
lv_dropdown_set_dir(dd, LV_DIR_RIGHT);
lv_dropdown_set_symbol(dd, LV_SYMBOL_RIGHT);
示例
c
void list_event_cb(lv_event_t * e){
    lv_obj_t * dd = lv_event_get_target(e);
    char buf[32];
    lv_dropdown_get_selected_str(dd, buf, sizeof(buf));
    printf("Option: %s\n", buf);

}
void my_gui(void)
{
    lv_obj_t * dd = lv_dropdown_create(lv_scr_act());
    lv_dropdown_set_options(dd, "Apple\nBanana\nOrange\nMelon\nGrape\nRaspberry\nCherry\nKiwi\nPineapple\nStrawberry\n");
    lv_obj_set_pos(dd, 10, 10);
    lv_obj_set_width(dd, 150);
    lv_obj_add_event_cb(dd, list_event_cb, LV_EVENT_VALUE_CHANGED, NULL);
    lv_dropdown_set_selected(dd, 5);

}
滚轮部件
以滚轮的方式展示选项, 多选一
- LV_PART_MAIN : 主体
- LV_PART_SELECTED : 选项框
设置选项间隔
c
void lv_style_set_text_line_space(lv_style_t * style, lv_coord_t value); //行间距设置内容
c
/**
 * Set the options on a roller
 * @param roller pointer to roller object
 * @param options a string with '\n' separated options. E.g. "One\nTwo\nThree"
 * @param mode `LV_ROLLER_MODE_NORMAL` 到头以后停止or `LV_ROLLER_MODE_INFINITE`一直循环
 */
void lv_roller_set_options(lv_obj_t * obj, const char * options, lv_roller_mode_t mode)
选项之间使用'\n'进行分割
事件
LV_EVENT_VALUE_CHANGEDSent when a new option is selected.
获取选项
To get the index of the currently selected option use lv_roller_get_selected(roller).
lv_roller_get_selected_str(roller, buf, buf_size) will copy the name of the selected option to buf.
设置可见的行数
The number of visible rows can be adjusted with lv_roller_set_visible_row_count(roller, num).
设置当前选项
You can select an option manually with lv_roller_set_selected(roller, id, LV_ANIM_ON), where id is the index of an option.
这一个部件可以使用add_state设置不可选中
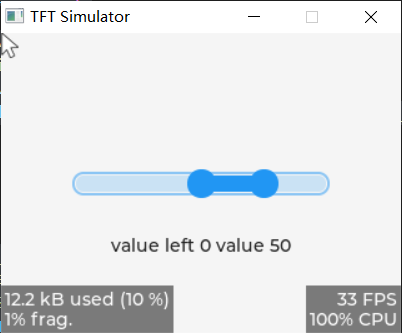
滑块lv_slider
用于调节某一个参数的值, 以直线的方式修改数值
- LV_PART_MAIN 主体
- LV_OART_INDICATOR 指示器
- LV_PART_KNOB 旋钮The knob can be made larger with the
paddingvalues. Padding values can be asymmetric too.
设置值
To set an initial value use lv_slider_set_value(slider, new_value, LV_ANIM_ON / OFF). The animation time is set by the styles' anim_time property. 设置当前值
To specify the range (min, max values), lv_slider_set_range(slider, min, max) can be used. The default range is 0..100, and the default drawing direction is from left to right in horizontal mode and bottom to top in vertical mode. If the minimum value is greater than the maximum value, like 100..0, the drawing direction changes to the opposite direction. 设置范围
模式
LV_SLIDER_MODE_NORMALA normal slider as described aboveLV_SLIDER_SYMMETRICALDraw the indicator form the zero value to current value. Requires negative minimum range and positive maximum range. 从零开始绘制LV_SLIDER_RANGEAllows setting the start value too by lv_bar_set_start_value(bar, new_value, LV_ANIM_ON / OFF). The start value has to be always smaller than the end value. 可以设置起始的值, 这一个模式有两个旋钮, 可以使用lv_slider_set/get_left_value()进行设置以及获取
示例
c
void slider_event_cb(lv_event_t *e)
{
    lv_event_code_t code = lv_event_get_code(e);
    lv_obj_t *slider = lv_event_get_target(e);
    if (code == LV_EVENT_VALUE_CHANGED)
    {
        lv_obj_t * lable= lv_event_get_user_data(e);
        uint32_t value = lv_slider_get_value(slider);
        printf("value: %d\n", value);
        lv_label_set_text_fmt(lable, "value left %d value %d", lv_slider_get_left_value(slider), lv_slider_get_value(slider));
    }
}

void my_gui(void)
{
    lv_obj_t *lable = lv_label_create(lv_scr_act());
    lv_obj_t *slider = lv_slider_create(lv_scr_act());
    lv_obj_set_width(slider, 200);
    lv_obj_align(slider, LV_ALIGN_CENTER, 0, 0);
    lv_slider_set_range(slider, 0, 100);
    lv_slider_set_value(slider, 50, LV_ANIM_OFF);
    lv_obj_add_event_cb(slider, slider_event_cb, LV_EVENT_VALUE_CHANGED, lable);
    lv_slider_set_mode(slider, LV_SLIDER_MODE_RANGE);
    lv_slider_set_range(slider, -100, 100);
    //设置标签
    lv_obj_align(lable, LV_ALIGN_CENTER, 0, 50);
    lv_label_set_text_fmt(lable, "value left %d value %d", lv_slider_get_left_value(slider), lv_slider_get_value(slider));
}
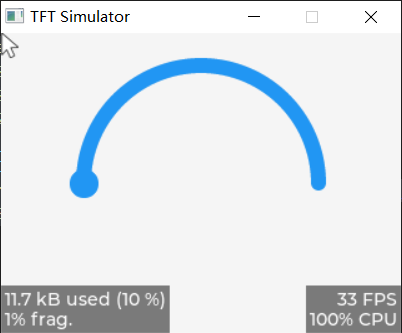
圆弧部件lv_arc
可以用来设置或者显示某一个值
LV_PART_MAINDraws a background using the typical background style properties and an arc using the arc style properties. The arc's size and position will respect the padding style properties.LV_PART_INDICATORDraws another arc using the arc style properties. Its padding values are interpreted relative to the background arc.LV_PART_KNOBDraws a handle on the end of the indicator using all background properties and padding values. With zero padding the knob size is the same as the indicator's width. Larger padding makes it larger, smaller padding makes it smaller.
设置数值
A new value can be set using lv_arc_set_value(arc, new_value). The value is interpreted in a range (minimum and maximum values) which can be modified with lv_arc_set_range(arc, min, max). The default range is 0..100.设置范围值
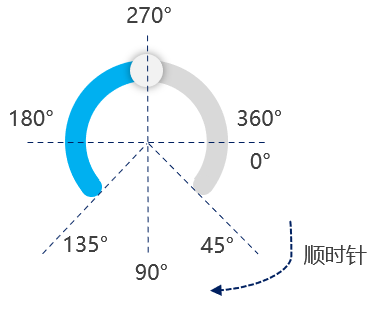
To set the start and end angle of the background arc use the lv_arc_set_bg_angles(arc, start_angle, end_angle) 背景角度functions or lv_arc_set_bg_start/end_angle(arc, angle).设置圆弧的角度, 前景角度
尽量不要使用这一个前景弧度的设置函数, 否则和当前值不同, 会导致问题
设置的时候先设置背景图, 后设置前景图
设置旋转角度
c
lv_arc_set_rotation(arc, 180)从起始的角度开始旋转(整张图进行旋转)
获取当前值
c
lv_arc_get_value(arc);设置模式, 圆弧的绘制速率
c
lv_arc_set_mode(arc, LV_ARC_MODE_REVERSE)
lv_arc_set_change_rate(arc, 90); //90°每秒cLV_ARC_MODE_NORMAL, //正常的模式, 顺时针进行绘制 LV_ARC_MODE_SYMMETRICAL, //对称的 LV_ARC_MODE_REVERSE //逆时针绘制
示例
c
void arc_callback(lv_event_t * e)
{
    lv_obj_t * arc = lv_event_get_target(e);
    printf("arc value: %d\n", lv_arc_get_value(arc));
}

void my_gui(void)
{
    lv_obj_t * arc = lv_arc_create(lv_scr_act());
    lv_arc_set_bg_angles(arc, 0, 180); //设置角度
    lv_arc_set_angles(arc, 0, 0); //设置显示的角度
    lv_obj_set_size(arc, 200, 200); //大小
    lv_obj_align(arc, LV_ALIGN_CENTER, 0, 0); //设置位置
    lv_arc_set_mode(arc, LV_ARC_MODE_REVERSE); //设置模式为逆时针
    lv_obj_add_event_cb(arc, arc_callback, LV_EVENT_VALUE_CHANGED, NULL);
    lv_arc_set_rotation(arc, 180); //设置旋转
}
去除旋钮
c
void lv_obj_remove_style(lv_obj_t * obj, lv_style_t * style, lv_style_selector_t selector);
lv_obj_remove_style(arc, NULL, LV_PART_INDICATOR);
c
lv_obj_clear_flag(arc, LV_OBJ_FLAG_CLICKABLE); //设置为不可点击线条部件lv_line
在一组坐标点里面依次绘制直线
The points have to be stored in an lv_point_precise_t array and passed to the object by the lv_line_set_points(lines, point_array, point_cnt) function.
c
static lv_point_t line_points[] = {{10, 10}, {70, 70}, {120, 10}};
lv_line_set_points(line, line_points, 3);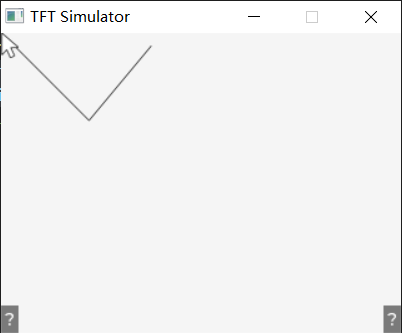
样式
c
void lv_style_set_line_width(lv_style_t * style, lv_coord_t value); //线条的宽度
void lv_style_set_line_dash_width(lv_style_t * style, lv_coord_t value); //线条的端点的属性
void lv_style_set_line_dash_gap(lv_style_t * style, lv_coord_t value); //设置虚线的宽度
void lv_style_set_line_rounded(lv_style_t * style, bool value); //线的头部是不是圆的
void lv_style_set_line_color(lv_style_t * style, lv_color_t value); //线的颜色
反转Y轴
By default, the y == 0 point is in the top of the object. It might be counter-intuitive in some cases so the y coordinates can be inverted with lv_line_set_y_invert(line, true). In this case, y == 0 will be the bottom of the object. y invert is disabled by default.
可以使用这一个部件实现文字下划线, 绘图等(设置多个点实现曲线)
在实际使用的时候可以使用对齐以及移动函数对着一个直线进行偏移
图片lv_img
实现图片的显示以及功能界面的优化
- LV_PART_MAIN 主体
设置图片源
c
LV_IMG_DECLEAR(img); //声明图片
lv_img_set_src(img, &img_bird);
图片可以来自数组, bin文件, 或者lvgl内置的图标
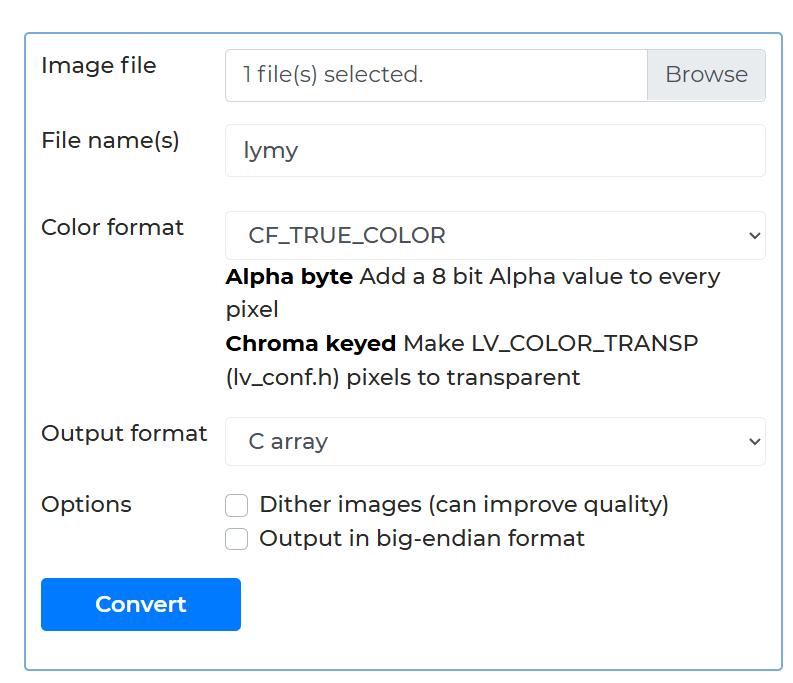
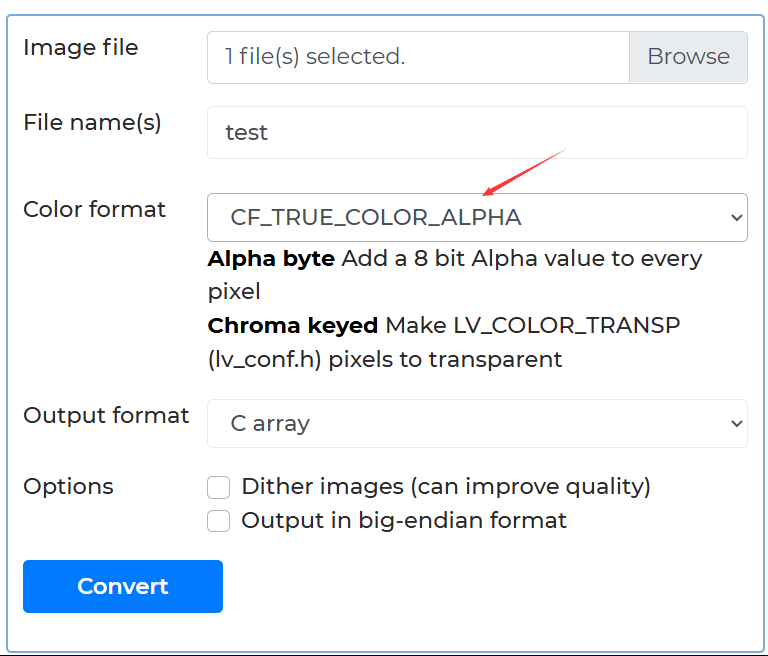
Online image converter - BMP, JPG or PNG to C array or binary | LVGLlvgl官方的转换工具
cLV_IMG_DECLARE(lymy); void my_gui(void) { lv_obj_t* img1 = lv_img_create(lv_scr_act()); lv_img_set_src(img1, &lymy); }clv_image_set_src(img, "S:folder1/my_img.bin") lv_image_set_src(img1, LV_SYMBOL_OK)
偏移
c
lv_img_set_offset_x(img, 100); //图片右移, 超出的部分会回到左侧缩放以及旋转
c
lv_img_set_zoom(img, 512); //设置缩放, 从128(1/2)到512(2倍)
lv_img_set_angle(img, 900); //顺时针旋转90°lv_image_set_scale_x(img, factor) and lv_image_set_scale_y(img, factor) also can be used to the scale independently horizontally and vertically (non-uniform scale).水平竖直方向的缩放
The quality of the transformation can be adjusted with lv_image_set_antialias(img, true). With enabled anti-aliasing the transformations are higher quality but slower.开启抗锯齿
设置中心点
这一个点是用于缩放以及旋转的点
c
lv_obj_update_layout(img);
lv_img_set_pivot(img, x, y);
色环部件lv_colorwheel
一般用在颜色选择
- LV_PART_MAIN 主题
- LV_PART_KNOB 旋钮
创建
c
lv_colorwheel_create(parent, knob_recolor); //设置这一个旋钮会不会重新着色设置当前颜色
c
lv_colorwheel_set_rgb(cw, lv_color_hex(color));获取颜色
c
lv_colorwheel_get_rgb(cw); //获取颜色设置模式
c
lv_colorwheel_set_mode(colorwheel, LV_COLORWHEEL_MODE_HUE/SATURATION/VALUE); //设置, 色相, 饱和度, 明度
lv_colorwheel_set_mode_fixed(colorwheel, true); //固定色环模式, 否则长按的话会进行色环的切换
按钮矩阵lv_btnmatrix
可以在不同的行和列里面显示多个轻量级按钮
- LV_PART_MAIN
- LV_PART_ITEMS 按钮
使用一个数组进行设置按钮, "\n"进行换行, 最后必须是一个NULL
c
static char * map[] = {"btn1", "btn2", "\n", "btn3", ""}
lv_btnmatrix_set_map(btnm, my_map)
设置按钮的宽度
这一个设置的是按钮的相对宽度
c
lv_btnmatrix_set_btn_width(btnm, id, width); //索引从0开始, 宽度1-7获取按钮信息
lv_btnmatrix_get_selected_btn(btnm) returns the index of the most recently released or focused button or LV_BTNMATRIX_BTN_NONE if no such button.
lv_btnmatrix_get_btn_text(btnm, btn_id) returns a pointer to the text of btn_idth button.
设置按钮的属性
c
lv_btnmatrix_set_btn_ctrl(btnm, id, LV_BTNMATRIX_CTRL_xxx); //设置某一个按钮
lv_btnmatrix_clear_btn_ctrl(btnm, id, LV_BTNMATRIX_CTRL_xxx);
lv_btnmatrix_set_btn_ctrl_all(btnm, LV_BTNMATRIX_CTRL_xxx); //设置所有的按钮
LV_BTNMATRIX_CTRL_HIDDENMakes a button hidden (hidden buttons still take up space in the layout, they are just not visible or clickable) 隐藏, 但是实际有占位LV_BTNMATRIX_CTRL_NO_REPEATDisable repeating when the button is long pressed 长按不重复触发LV_BTNMATRIX_CTRL_DISABLEDMakes a button disabled LikeLV_STATE_DISABLEDon normal objects 失能LV_BTNMATRIX_CTRL_CHECKABLEEnable toggling of a button. I.e.LV_STATE_CHECHEDwill be added/removed as the button is clicked 可以切换状态LV_BTNMATRIX_CTRL_CHECKEDMake the button checked. It will use theLV_STATE_CHECHKEDstyles. 设置选中LV_BTNMATRIX_CTRL_CLICK_TRIGEnabled: send LV_EVENT_VALUE_CHANGE on CLICK, Disabled: send LV_EVENT_VALUE_CHANGE on PRESSLV_BTNMATRIX_CTRL_POPOVERShow the button label in a popover when pressing this keyLV_BTNMATRIX_CTRL_RECOLOREnable recoloring of button texts with#. E.g."It's #ff0000 red#"设置文本重新着色LV_BTNMATRIX_CTRL_CUSTOM_1Custom free to use flagLV_BTNMATRIX_CTRL_CUSTOM_2Custom free to use flag
单次选中
设置只有一个按钮可以选择
c
lv_btnmatrix_set_one_checked(btnm, true); //需要开启LV_BTNMATRIX_CTRL_CHECKABLE获取选中
c
bool lv_btnmatrix_has_btn_ctrl(lv_obj_t *obj, uint16_t btn_id, lv_btnmatrix_ctrl_t ctrl);
for(i = 1; i < 7; i++) {
    if(lv_btnmatrix_has_btn_ctrl(obj, i, LV_BTNMATRIX_CTRL_CHECKED)) break;
}
设置透明
c
lv_obj_set_style_border_width(btnm1, 0, LV_PART_MAIN);
lv_obj_set_style_bg_opa(btnm1, 0, LV_PART_MAIN); /*Hide the background*/
lv_obj_set_style_bg_opa(btnm1, 0, LV_PART_ITEMS); /*Hide the background*/
lv_obj_set_style_shadow_width(btnm1, 0, LV_PART_ITEMS);
lv_obj_set_style_shadow_width(btnm1, 0, LV_PART_MAIN);
文本区域lv_textarea
文本输入框, 用户可以在里面输入文本内容
- LV_PART_MAIN 主体
- LV_PART_SCROLLBAR 滚动条
- LV_PART_SELECTED 选中文本
- LV_PART_CURSOR 光标
- LV_PART_TEXTAREA_PLACEHOLDER 占位符(默认文字)
添加文本
lv_textarea_add_char(textarea, 'c')lv_textarea_add_text(textarea, "insert this text")
To add wide characters like
'á','ß'or CJK characters uselv_textarea_add_text(ta, "á")
lv_textarea_set_text(ta, "New text") changes the whole text.
删除文本
To delete a character from the left of the current cursor position use lv_textarea_del_char(textarea). To delete from the right use lv_textarea_del_char_forward(textarea)
设置占位符
A placeholder text can be specified - which is displayed when the Text area is empty - with lv_textarea_set_placeholder_text(ta, "Placeholder text")
使用键盘
c
lv_obj_t *keyboard = lv_keyboard_create(lv_src_act());
lv_keyboard_set_textarea(keyboard, ta)
设置光标
The cursor position can be modified directly like lv_textarea_set_cursor_pos(textarea, 10). The 0 position means "before the first characters", LV_TA_CURSOR_LAST means "after the last character"
lv_textarea_cursor_right(textarea)lv_textarea_cursor_left(textarea)lv_textarea_cursor_up(textarea)lv_textarea_cursor_down(textarea)
If lv_textarea_set_cursor_click_pos(textarea, true) is applied the cursor will jump to the position where the Text area was clicked.设置点击切换光标位置
单行模式
If lv_textarea_set_cursor_click_pos(textarea, true) is applied the cursor will jump to the position where the Text area was clicked.
密码模式
lv_textarea_set_password_mode(textarea, true).
If the • (Bullet, U+2022) character exists in the font, the entered characters are converted to it after some time or when a new character is entered. If • not exists, * will be used.
In password mode lv_textarea_get_text(textarea) returns the actual text entered, not the bullet characters.
可以使用lv_textarea_passwd_show_time(ta, time)设置字符显示的时间, 之后隐藏
The visibility time can be adjusted with LV_TEXTAREA_DEF_PWD_SHOW_TIME in lv_conf.h还可以通过配置文件`
设置可以输入的字符
You can set a list of accepted characters with lv_textarea_set_accepted_chars(textarea, "0123456789.+-"). Other characters will be ignored.
设置最大长度
The maximum number of characters can be limited with lv_textarea_set_max_length(textarea, max_char_num)
事件
LV_EVENT_INSERTSent right before a character or text is inserted. The event parameter is the text about to be inserted.lv_textarea_set_insert_replace(textarea, "New text")replaces the text to insert. The new text cannot be in a local variable which is destroyed when the event callback exists.""means do not insert anything.LV_EVENT_VALUE_CHANGEDSent when the content of the text area has been changed.LV_EVENT_READYSent whenLV_KEY_ENTERis pressed (or sent) to a one line text area.
有多个文本框的时候, 可以使用LV_EVENT_FOCUSED这一个事件控制实际聚焦的文本框
键盘lv_keyboard
- LV_PART_MAIN主题部分
- LV_PART_ITEMS 按钮
关联文本框
You can assign a Text area to the Keyboard to automatically put the clicked characters there. To assign the text area, use lv_keyboard_set_textarea(kb, ta).
设置模式
LV_KEYBOARD_MODE_TEXT_LOWERDisplay lower case letters 小写LV_KEYBOARD_MODE_TEXT_UPPERDisplay upper case letters 大写LV_KEYBOARD_MODE_TEXT_SPECIALDisplay special characters 特殊字符LV_KEYBOARD_MODE_NUMBERDisplay numbers, +/- sign, and decimal dot 数字LV_KEYBOARD_MODE_USER_1throughLV_KEYBOARD_MODE_USER_4User-defined modes.
To set the mode manually, use lv_keyboard_set_mode(kb, mode). The default mode is LV_KEYBOARD_MODE_TEXT_UPPER.
弹窗
To enable key popovers on press, like on common Android and iOS keyboards, use lv_keyboard_set_popovers(kb, true)
事件
LV_EVENT_VALUE_CHANGEDSent when the button is pressed/released or repeated after long press. The event data is set to the ID of the pressed/released button.LV_EVENT_READY- The Ok button is clicked.LV_EVENT_CANCEL- The Close button is clicked.
按键重设
LV_SYMBOL_OKApply.LV_SYMBOL_CLOSEorLV_SYMBOL_KEYBOARDClose.LV_SYMBOL_BACKSPACEDelete on the left.LV_SYMBOL_LEFTMove the cursor left.LV_SYMBOL_RIGHTMove the cursor right.LV_SYMBOL_NEW_LINENew line.- "ABC" Load the uppercase map.
- "abc" Load the lower case map.
- "1#" Load the lower case map.
You can specify a new map (layout) for the keyboard with
lv_keyboard_set_map(kb, map)andlv_keyboard_set_ctrl_map(kb, ctrl_map)
实现切换键盘
c
void kb_cb(lv_event_t *e){
    lv_event_code_t code = lv_event_get_code(e);
    lv_obj_t * obj = lv_event_get_target(e);
    printf("there1\n");
    if(code == LV_EVENT_VALUE_CHANGED){
        printf("there\n");
        uint16_t id = lv_btnmatrix_get_selected_btn(obj);
        const char * txt = lv_btnmatrix_get_btn_text(obj, id);
        if(strcmp(txt, LV_SYMBOL_KEYBOARD) == 0){
            if(lv_keyboard_get_mode(obj) == LV_KEYBOARD_MODE_NUMBER){
                lv_keyboard_set_mode(obj, LV_KEYBOARD_MODE_TEXT_LOWER);
            }else{
                lv_keyboard_set_mode(obj, LV_KEYBOARD_MODE_NUMBER);

            }
        }
    }
}
这里获取信息实际使用的是矩阵键盘的获取方式
示例
c
Instead of the regular lv_obj_add/clear_state() functions the lv_imgbtn_set_state(imgbtn, LV_IMGBTN_STATE_...) functions should be used to manually set a state.图片按钮
- LV_PART_MAIN
设置图片
To set the image in a state, use the lv_imgbtn_set_src(imgbtn, LV_IMGBTN_STATE_..., src_left, src_center, src_right).
这里可以为不同的状态设置不同的图片源, 同时可以展示三个图片源, 为了显示, 需要计算三个图片的大小
LV_IMGBTN_STATE_RELEASEDLV_IMGBTN_STATE_PRESSEDLV_IMGBTN_STATE_DISABLEDLV_IMGBTN_STATE_CHECKED_RELEASEDLV_IMGBTN_STATE_CHECKED_PRESSEDLV_IMGBTN_STATE_CHECKED_DISABLED
设置状态
Instead of the regular lv_obj_add/clear_state() functions the lv_imgbtn_set_state(imgbtn, LV_IMGBTN_STATE_...) functions should be used to manually set a state.
c
void event_cb(lv_event_t * e)
{
    lv_obj_t * obj = lv_event_get_target(e);
    lv_event_code_t code = lv_event_get_code(e);
    if (code == LV_EVENT_PRESSED)
    {
        lv_obj_set_style_img_opa(obj, LV_OPA_50, LV_STATE_DEFAULT);
    }
    if (code == LV_EVENT_RELEASED)
    {
        lv_obj_set_style_img_opa(obj, LV_OPA_100, LV_STATE_DEFAULT);
    }
}

void my_gui(void)
{
    lv_obj_t * imgbtn = lv_imgbtn_create(lv_scr_act());
    lv_imgbtn_set_src(imgbtn, LV_IMGBTN_STATE_RELEASED, NULL, &lymy, NULL);
    lv_obj_align(imgbtn, LV_ALIGN_CENTER, 0, 0);
    lv_obj_add_event_cb(imgbtn, event_cb, LV_EVENT_ALL, NULL);
}
透明度图片
选项卡
可以实现多个页面的切换
Tab view is built from other widgets:
- Main container: lv_obj)
- Tab buttons: lv_btnmatrix
- Container for the tabs: lv_obj
- Content of the tabs: lv_obj
创建
lv_tabview_create(parent, tab_pos, tab_size); creates a new empty Tab view. tab_pos can be LV_DIR_TOP/BOTTOM/LEFT/RIGHT to position the tab buttons to a side. tab_size is the height (in case of LV_DIR_TOP/BOTTOM) or width (in case of LV_DIR_LEFT/RIGHT) tab buttons. 创建, 同时设置垂直水平以及切换按钮的宽度
添加选项卡
New tabs can be added with lv_tabview_add_tab(tabview, "Tab name"). This will return a pointer to an lv_obj object where the tab's content can be created.
设置当前
Use lv_tabview_set_act(tabview, id, LV_ANIM_ON/OFF) function
示例
c
lv_obj_t * tabview = lv_tabview_create(lv_scr_act(), LV_DIR_TOP, 25);

lv_obj_t * tab1 = lv_tabview_add_tab(tabview, "Tab 1");
lv_obj_t * tab2 = lv_tabview_add_tab(tabview, "Tab 2");
lv_obj_t * tab3 = lv_tabview_add_tab(tabview, "Tab 3");

lv_obj_t * label1 = lv_label_create(tab1);
lv_label_set_text(label1, "This is a label on tab 1");
获取组件
c
lv_obj_t * lv_tabview_get_tab_btns(lv_obj_t * tv);//获取按键矩阵
lv_obj_t * lv_tabview_get_content(lv_obj_t * tv); //获取主题
可以获取按钮矩阵
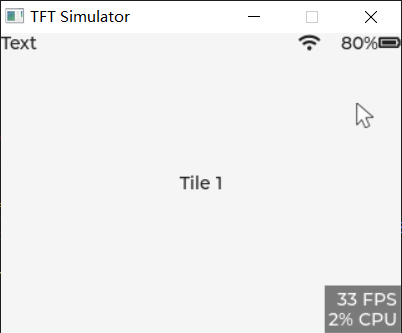
平铺视图
可以实现不同方向的页面切换, 使用滑动进行切换
- LV_PART_MAIN
- LV_PART_SCROLLBAR
添加页面
lv_tileview_add_tile(tileview, row_id, col_id, dir) creates a new tile on the row_idth row and col_idth column. dir can be LV_DIR_LEFT/RIGHT/TOP/BOTTOM/HOR/VER/ALL or OR-ed values to enable moving to the adjacent tiles into the given direction by swiping. 第二三个参数适用于设置页面的位置, 最后一个参数是可以切换的位置
设置当前页面
The Tile view can scroll to a tile with lv_obj_set_tile(tileview, tile_obj, LV_ANIM_ON/OFF) or lv_obj_set_tile_id(tileviewv, col_id, row_id, LV_ANIM_ON/OFF);
移除滚动条
lv_obj_remove_style(tileview, NULL, LV_PART_SCROLLBAR)
这时候设置以主界面为父对象的界面会固定在那里
示例
c
void my_gui(void)
{
    lv_obj_t * tileview = lv_tileview_create(lv_scr_act());
    lv_obj_t * tile1 = lv_tileview_add_tile(tileview, 0, 0, LV_DIR_ALL);
    lv_obj_t * tile2 = lv_tileview_add_tile(tileview, 1, 0, LV_DIR_ALL);
    lv_obj_t * tile3 = lv_tileview_add_tile(tileview, 1, 1, LV_DIR_ALL);
    lv_obj_t * tile4 = lv_tileview_add_tile(tileview, 0, 1, LV_DIR_ALL);
    lv_obj_t * label1 = lv_label_create(tile1);
    lv_label_set_text(label1, "Tile 1");

    lv_obj_t * label2 = lv_label_create(tile2);
    lv_label_set_text(label2, "Tile 2");

    lv_obj_t * label3 = lv_label_create(tile3);
    lv_label_set_text(label3, "Tile 3");

    lv_obj_t * label4 = lv_label_create(tile4);
    lv_label_set_text(label4, "Tile 4");

    lv_obj_center(label1);
    lv_obj_center(label2);
    lv_obj_center(label3);
    lv_obj_center(label4);

    lv_obj_t * lable_left = lv_label_create(lv_scr_act());
    lv_label_set_text(lable_left, "8:00 AM");
    lv_obj_align(lable_left, LV_ALIGN_TOP_LEFT, 0, 0);
    lv_obj_t * lable_reight = lv_label_create(lv_scr_act());
    lv_label_set_text(lable_left, LV_SYMBOL_WIFI "    80%"  LV_SYMBOL_BATTERY_FULL);
    lv_obj_align(lable_left, LV_ALIGN_TOP_RIGHT, 0, 0);
    lv_obj_remove_style(tileview, NULL, LV_PART_SCROLLBAR);
}
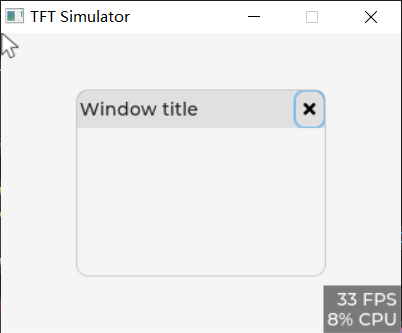
窗口lv_win
可以作为一个容器展示不同的页面
The Window is built from other widgets so you can check their documentation for details:
- Background: lv_obj
- Header on the background: lv_obj
- Title on the header: lv_label
- Buttons on the header: lv_btn
- Content area on the background: lv_obj
c
lv_win_create(parent, header_height) //creates a Window with an empty header.添加标题以及按钮
Any number of texts (but typically only one) can be added to the header with lv_win_add_title(win, "The title").
Control buttons can be added to the window's header with lv_win_add_btn(win, icon, btn_width). icon can be any image source, and btn_width is the width of the button.
获取主体
lv_win_get_header(win) returns a pointer to the header, lv_win_get_content(win) returns a pointer to the content container to which the content of the window can be added.
示例
c
void win_close_event_cb(lv_event_t * e)
{
    lv_obj_t * win = lv_event_get_user_data(e);
    lv_obj_del(win);
}

void my_gui(void)
{
    lv_obj_t *win = lv_win_create(lv_scr_act(), 30);
    lv_win_add_title(win, "Window title");
    lv_obj_set_size(win, 200, 150);
    lv_obj_align(win, LV_ALIGN_CENTER, 0, 0);

    lv_obj_set_style_border_width(win, 1, LV_STATE_DEFAULT);
    lv_obj_set_style_border_opa(win, LV_OPA_20, LV_STATE_DEFAULT);
    lv_obj_set_style_border_color(win, lv_color_hex3(0x222), LV_STATE_DEFAULT);
    lv_obj_set_style_radius(win, 10, LV_STATE_DEFAULT); //设置圆角

    lv_obj_t *btn = lv_win_add_btn(win, LV_SYMBOL_CLOSE, 20);
    lv_obj_add_event_cb(btn, win_close_event_cb, LV_EVENT_CLICKED, win);
    lv_obj_set_style_shadow_width(btn, 0, LV_STATE_DEFAULT);
    lv_obj_set_style_text_color(btn, lv_color_hex3(0), LV_STATE_DEFAULT);
    lv_obj_set_style_text_color(btn, lv_color_hex3(0xff0000), LV_STATE_PRESSED);

    lv_obj_set_style_bg_opa(btn, 0, LV_STATE_DEFAULT);
}
消息框lv_msgbox
- Background: lv_obj
- Close button: lv_btn
- Title and text: lv_label
- Buttons: lv_btnmatrix
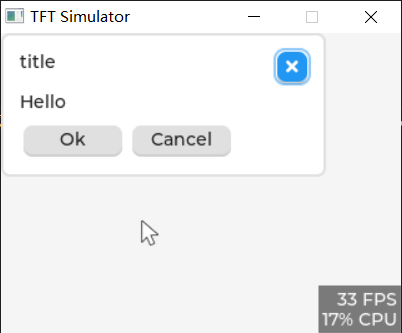
lv_msgbox_create(parent, title, txt, btn_txts[], add_close_btn)
If
parentisNULLthe message box will be modal.titleandtxtare strings for the title and the text.btn_txts[]is an array with the buttons' text. E.g.const char * btn_txts[] = {"Ok", "Cancel", NULL}.add_colse_btncan betrueorfalseto add/don't add a close button.
lv_obj_t *msgbox = lv_msgbox_create(lv_scr_act(), "title", "Hello", btns, true);
关闭
lv_msgbox_close(msgbox) closes (deletes) the message box.
获取部件
c
lv_obj_t * lv_msgbox_get_title(lv_obj_t * mbox);
lv_obj_t * lv_msgbox_get_close_btn(lv_obj_t * mbox);
lv_obj_t * lv_msgbox_get_text(lv_obj_t * mbox);
lv_obj_t * lv_msgbox_get_btns(lv_obj_t * mbox);
事件
LV_EVENT_VALUE_CHANGED is sent by the buttons if one of them is clicked.
LV_OBJ_FLAG_EVENT_BUBBLE is enabled on the buttons so you can add events to the message box itself. In the event handler, lv_event_get_target(e) will return the button matrix and lv_event_get_current_target(e) will return the message box.
lv_msgbox_get_active_btn(msgbox) and lv_msgbox_get_active_btn_text(msgbox) can be used to get the index and text of the clicked button.获取按压的按钮的索引以及文字
显示以及隐藏
c
lv_obj_add_flag(msgbox, LV_OBJ_FLAG_HIDDEN);
lv_obj_clear_flag(msgbox, LV_OBJ_FLAG_HIDDEN);
示例
c
void event_cb(lv_event_t *e){
lv_event_code_t code = lv_event_get_code(e);
lv_obj_t * obj = lv_event_get_current_target(e); //使用这一个才可以获取
if(code == LV_EVENT_VALUE_CHANGED){
const char * txt = lv_msgbox_get_active_btn_text(obj);
printf("Button: %s\n", txt);
lv_obj_del(obj);
}
}
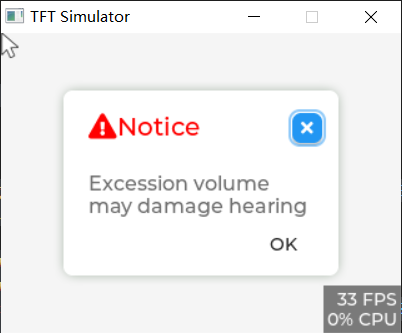
const char* btns[] = {" ", " ", "OK", ""};
void my_gui(void)
{
lv_obj_t *msgbox = lv_msgbox_create(lv_scr_act(), LV_SYMBOL_WARNING "Notice", "Excession volume may damage hearing", btns, true);
lv_obj_set_size(msgbox, 220, 148);
lv_obj_center(msgbox);
lv_obj_set_style_border_width(msgbox, 0, LV_STATE_DEFAULT);
lv_obj_set_style_shadow_width(msgbox, 20, LV_STATE_DEFAULT);
lv_obj_set_style_shadow_color(msgbox, lv_color_hex3(0xa9a9a9), LV_STATE_DEFAULT);
lv_obj_set_style_pad_top(msgbox, 18, LV_STATE_DEFAULT);
lv_obj_set_style_pad_left(msgbox, 20, LV_STATE_DEFAULT); //设置填充(左边间距)
lv_obj_add_event_cb(msgbox, event_cb, LV_EVENT_VALUE_CHANGED, NULL);
lv_obj_t * title = lv_msgbox_get_title(msgbox);
lv_obj_set_style_text_color(title, lv_color_hex(0xff0000), LV_STATE_DEFAULT);
lv_obj_set_style_text_font(title, &lv_font_montserrat_20, LV_STATE_DEFAULT);
lv_obj_t * content = lv_msgbox_get_content(msgbox);
lv_obj_set_style_text_font(content, &lv_font_montserrat_16, LV_STATE_DEFAULT);
lv_obj_set_style_text_color(content, lv_color_hex(0x6c6c6c), LV_STATE_DEFAULT);
lv_obj_set_style_pad_top(content, 15, LV_STATE_DEFAULT);
lv_obj_t * btns_bg = lv_msgbox_get_btns(msgbox);
lv_obj_set_style_bg_opa(btns_bg, 0, LV_PART_ITEMS);
lv_obj_set_style_shadow_width(btns_bg, 0, LV_PART_ITEMS);
lv_obj_set_style_border_width(btns_bg, 0, LV_PART_ITEMS);
}
微调器
实际是一个数字文本, 可以精确调节参数的值
- LV_PART_MAIN
- LV_PART_CURSOR
设置值
lv_spinbox_set_value(spinbox, 1234) sets a new value on the Spinbox. 设置当前值
lv_spinbox_increment(spinbox) and lv_spinbox_decrement(spinbox) increments/decrements the value of the Spinbox according to the currently selected digit. 当前选中的值加减
lv_spinbox_set_range(spinbox, -1000, 2500) sets a range. If the value is changed by lv_spinbox_set_value, by Keys,lv_spinbox_increment/decrement this range will be respected. 设置范围
lv_spinbox_set_step(spinbox, 100) sets which digits to change on increment/decrement. Only multiples of ten can be set, and not for example 3. 设置步长, 实际是移动一下光标的位置
lv_spinbox_set_pos(spinbox, 1) sets the cursor to a specific digit to change on increment/decrement. For example position '0' sets the cursor to the least significant digit. 和上一个会冲突
If an encoder is used as input device, the selected digit is shifted to the right by default whenever the encoder button is clicked. To change this behaviour to shifting to the left, the lv_spinbox_set_digit_step_direction(spinbox, LV_DIR_LEFT) can be used 设置选中的移动方向
设置格式
lv_spinbox_set_digit_format(spinbox, digit_count, separator_position) sets the number format. digit_count is the number of digits excluding the decimal separator and the sign. separator_position is the number of digits before the decimal point. If 0, no decimal point is 设置格式, 总的位数以及小数点的位置(第二个参数是整数的位置)
这一个小数点只是一个显示, 不会改变实际的值
获取当前值
c
lv_spinbox_get_value(spinbox);示例
c
void btn1_event_cb(lv_event_t *e)
{
lv_obj_t *spinbox = lv_event_get_user_data(e);
lv_spinbox_increment(spinbox);
int value = lv_spinbox_get_value(spinbox);
int value1 = value / 1000;
int value2 = value % 1000;
printf("Value = %d.%d\n", value1, value2 > 0 ? value2 : -value2);
}
void btn2_event_cb(lv_event_t *e)
{
lv_obj_t *spinbox = lv_event_get_user_data(e);
lv_spinbox_decrement(spinbox);
int value = lv_spinbox_get_value(spinbox);
int value1 = value / 1000;
int value2 = value % 1000;
printf("Value = %d.%d\n", value1, value2 > 0 ? value2 : -value2);
}
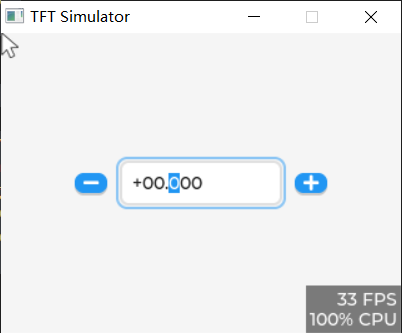
void my_gui(void)
{
lv_obj_t *spinbox = lv_spinbox_create(lv_scr_act());
lv_spinbox_set_range(spinbox, -10000, 10000);
lv_spinbox_set_digit_format(spinbox, 5, 2);
lv_spinbox_set_step(spinbox, 100);
lv_obj_center(spinbox);
lv_obj_t *btn1 = lv_btn_create(lv_scr_act());
lv_obj_align_to(btn1, spinbox, LV_ALIGN_OUT_RIGHT_MID, 10, 0);
lv_obj_add_event_cb(btn1, btn1_event_cb, LV_EVENT_CLICKED, spinbox);
lv_obj_set_style_bg_img_src(btn1, LV_SYMBOL_PLUS, 0);
lv_obj_t *btn2 = lv_btn_create(lv_scr_act());
lv_obj_align_to(btn2, spinbox, LV_ALIGN_OUT_LEFT_MID, -10, 0);
lv_obj_add_event_cb(btn2, btn2_event_cb, LV_EVENT_CLICKED, spinbox);
lv_obj_set_style_bg_img_src(btn2, LV_SYMBOL_MINUS, 0);
}
表格lv_table
LV_PART_MAINThe background of the table uses all the typical background style properties.LV_PART_ITEMSThe cells of the table also use all the typical background style properties and the text properties.
设置行列
To explicitly set number of rows and columns use lv_table_set_row_cnt(table, row_cnt) and lv_table_set_col_cnt(table, col_cnt) 设置行数以及列数
设置内容
lv_table_set_cell_value(table, row, col, "Content"). The text is saved by the table so it can be even a local variable.
void lv_table_set_cell_value_fmt(lv_obj_t * obj, uint16_t row, uint16_t col, const char * fmt, ...)格式化输入
表格里面可以使用换行符
设置宽度
The width of the columns can be set with lv_table_set_col_width(table, col_id, width). The overall width of the Table object will be set to the sum of columns widths.
高度是里面的内容决定的
水平合并
Cells can be merged horizontally with lv_table_add_cell_ctrl(table, row, col, LV_TABLE_CELL_CTRL_MERGE_RIGHT). To merge more adjacent cells call this function for each cell.